Saturday, 18 October 2014

Creating a Reminder Workflow on a standard Task List in SharePoint 2013 / SharePoint Online

SharePoint Task lists are one of the great strengths of SharePoint Team Sites. Having a central list to keep track of and assign tasks to people is great for productivity.
But what about when people ignore the list their tasks within it?
In this blog I am going to create a fairly simple SharePoint Designer List Workflow that each day will check whether a task is Overdue AND not Complete, and send a reminder email to the person who is in the Assigned To field.
This will work for a standard Task list. I have created it in Office365 environment, but this will also work on your On-Prem SharePoint 2013 install.
So here goes…

Step 1: Create the list Workflow in SharePoint Designer


Step 2: Set up the Stages.

In this workflow, we require two stages: Running, and Finished.

So go ahead and create them using the "Stage" dropdown:

Step 3: Set the conditions

This example uses lots of conditions to check whether it should send the email so you’ll need to insert a 4 conditions within the Running stage.
1. If any value equals value
2. If any value equals value
3. Person is a Valid SharePoint User
4. If any value equals value


So your blank conditions will look like this:

Condition 1: Current Item:Due Date is less than Current date

Condition 2: Current Item:Due Date is greater than 01/01/2000 (this accounts for instances where Due Date is left blank)


Condition 3: Current Item: Assigned to is a valid SharePoint user

Condition 4: Current Item: Task Status not equals Completed


So all of the Conditions together should look like this:

Step 4: Set the Actions

So, what actions to perform if the above evaluates to True?
1. Find Interval Between dates
2. Find Substring in String
3. Extract Substring from start of string
4. Send an email
5. Log to History list


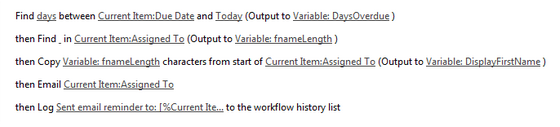
Once you have added these blank actions to your workflow, it will look like this:

Action 1: Find days between Current Item:Due Date and Today (output to Variable:DaysOverdue)

Action 2: Find <space> in Current Item:Assigned To (Output to Variable:fnameLength)
This action will get the number of letters in the first name. Assumes that the Assigned To Display name looks like "John Citizen".

Action 3: Copy Variable:fnameLength (the number of characters in the first name) from the Current Item: Assigned To (Output to Variable:DisplayFirstName).
Output to the DisplayFirstName variable should be "John".

Action 4: Send the email (details below)
Action 5: Log "Sent email reminder" to the workflow history list.

So the finished product of Actions will look like this:

Create the Email


Step 5: The Finished Product:

Stage: Running  If Current Item:Due Date is less than Today and Current Item:Due Date is greater than 01/01/2000 AM  and Current Item:Assigned To is a valid SharePoint user  and Current Item: Task Status not equals Completed  Find days between Current Item:Due Date and (Output to Variable: DaysOverdue )  then Find in Current Item:Assigned To (Output to Variable: fnameLength )  then Copy Variable: fnameLength characters from start of Current Item:Assigned To (Output to Variable: DisplayFirstName )  then Email Current Item:Assigned To  then Log Sent email reminder to: Current Item:Assigned To to the workflow history list  then Pause for I days, 0 hours, 0 minutes  Transition to stage  If Current Item: Task Status equals Completed  Go to Finished  Else Go to Running  Stage: Finished  Log Reminder Task completed by Current Item:Modified By to the workflow history list  Transition to stage  Go to End of Workflow

Step 7: Final Configurations


Tuesday, 16 September 2014

Problem importing Managed Metadata Service

Thanks to this very nice post from Chaitu Madala, I was able to move my Managed Metadata Service from my Dev environment to Test.

I was quite pleased with this progression, but when I moved to my Test environment, I got the following error:

Import-SPMetadataWebServicePartitionData : The conversion of a nvarchar data type to a datetime data type resulted in an out-of-range value.
The statement has been terminated.
To fix,

  • SQL Server Management Studio > Security > Logins
  • Find the account that is running the Application Pool for your MM Service App, 
  • Go to the properties for that login and see what the Default Language is.
  • If it is set to British English, then change it to English
  • Click OK.


Thursday, 10 July 2014

The remote server returned an error: (401) Unauthorized. SharePoint BCS

Frustrating couple of hours yesterday trying to figure out a 401 Unauthorized error when trying to access an External BCS list programatically using the CSOM.

After jumping through a few well documented gottchas, I finally came stumped on the error on my console:

The remote server returned an error: (401) Unauthorized.

The error came straight after my command:

ctx.ExecuteQuery();

I finally got the tip from forums that the issue related to Alternate Access Mappings.

In my code's settings.xml, I was referring to the FQDN URL:  http://machine.domain.ext.com:port

However, in the Namespace of the External Content Type (in SharePoint Designer), it was referring just to http://machine:port.

Once I updated my code to use the same URL as the External Content Type Configuration, it all worked perfectly.

Thursday, 22 August 2013

JQuery image lightbox for SharePoint 2010

When creating large content pages with multiple images embedded (like help documentation or blogs), the content may be more readable if there are small images within the body of the page that expand out to larger, light-boxed images when clicked.  Or you may prefer to have hyperlinks on the page with a unique style (like a red hyperlink) so that users can click on it to see a pop up image. 
This blog walks through the process to meet each of these scenarios.

Note that this has been implemented in SharePoint using the standard modal dialog (SP.UI.ModalDialog.showModalDialog) that comes out of the box with SP 2010.  JQuery is still required, but SharePoint does most of the heavy lifting.

The steps taken:

Part 1: Set up the CSS and Masterpage

  1. CSS: In a .css stylesheet that is referenced in your Master Page, add the following classes:
    /* Lightbox Styles */ img.ms-rteImage-LightBox {      -ms-name: "LightBox";      width: 12px;     margin:0px !important;     cursor: pointer;  }  a.ms-rteElement-LightBox {   -ms-name: "LightBox";      text-decoration:underline;     font-weight:bold; }
  2. Reference JQuery in Master Page: Within the <head> tags of your /_catalogs/masterpage/Custom.master Master Page, add a reference to the JQuery code in appropriate location (version 1.10 + is required):

    <script type="text/javascript" src="http://sitecollection/Style Library/Scripts/jquery.js"></script>
  3. MasterPage: In the footer of the same Master Page, add the following:
  4. More CSS (optional): Finally, you may wish to fix the modal dialog on the page - meaning that wherever you were scrolled to on the page, the dialog will always be in the centre of the screen.
    To do this, update a style sheet that is called by the System Master Page (most likely "v4.master" but you can check at SiteCollection/_Layouts/ChangeSiteMasterPage.aspx).
    Add the following class:

Part 2: Applying the pop-up to content pages

Applying the pop-up using images


  1. Insert a logo image on the page.  This is the one I have used:Icon Image used for Modal Dialog popup images.
  2. Apply the “Lightbox” style from the “Image Style” drop down:
  3. Insert a link on the image to the image that you want to see in the modal dialog:

Applying the pop-up using Hyperlinks

To apply the pop-up image functionality to inline text, rather than using an icon image, do the following:

  1. Insert the text into the page, highlight and select “Insert” Link
  2. Open the page in HTML mode, add the class to the <a> tag:
    a class="ms-rteElement-LightBox"
  3. Save the page and click on the link to see the image in Modal Dialog form

The finished product

Your pages look clean and mean:
And when users click on a familiar icon (or hyperlink style), a helpful modal dialog will popup and give them a full resolution image to enrich your content:


Finally, of the snippets above can be downloaded here.

Friday, 12 July 2013

itemstyle.xsl Grid View returns blank rows in IE7

This is a problem that will have diminishing significance as fewer and fewer organisations are still using IE7 as their corporate browser (thank God!).
I was looking to display the output of a SharePoint CQWP as a Grid view using a custom template in XSLT.  I was able to achieve this by following this very helpful blog:
http://paulgalvinsoldblog.wordpress.com/2007/12/09/display-content-query-web-part-results-in-a-grid-table/

This was fine for me in IE8, IE9, Firefox and Chrome.

The problem came when I browsed to the site using IE7. See image:


As can be seen, a blank set of tags was being inserted by SharePoint (<>) which was creating a line break.

How did I fix it? By using Child and Descendant selectors in CSS.

in my custom style sheet, I added the following code:
tr>td>table>tbody>tr>td>table>tbody>tr>td>div>div>ul>li>table>tbody li {
height: 1px; overflow: hidden; display: none; visibility: hidden;
}

HTH. :)

Monday, 8 July 2013

People Picker Field PDFs vs. Office Documents

I was having intermittent issues with a custom alert email that I had created.  It would send most of the time, but would inexplicably not always work.
A better programmer than me would have set up exception catching that wrote to the Event Viewer but I couldn't seem to get that to work (might blog on that one later).
Alas, after much frustration I noticed that the alert emails were only firing for Office Documents (eg. Word, Excel) and not for PDFs.
This perplexed me so I opened up SharePoint Manager and browsed down to the items I was trying to render.
On comparison of the properties I was trying to render to the Alert email, I noticed that Office Documents stored People Picker user names as 15;#John Smith, while PDF documents store People Picker User names as just 15.
So my short-cut function that previously read:
       private string GetPPorLookupValue(string LongString)
        // Takes People Picker or Lookup column input in the format: 15;#John Smith
        // splits it and returns "John Smith" (to right of '#')
        {
            string[] SplitArray = LongString.Split('#');
            return SplitArray[1].ToString();
        }

Needed to be made a little bit more robust by actually referring to the User Listing in SharePoint:

        private int GetPPorLookupInteger(string LongString)
        // Takes People Picker or Lookup column input in the format: 15;#John Smith or 15
        // splits it and returns integer 15 (to left of ';', if exists)
        {
            string[] SplitArray = LongString.Split(';');
            int UserNum = Convert.ToInt32(SplitArray[0]);
            return UserNum;
        }

        private string GetUserName_ID(int UserID, SPAlertHandlerParams ahp)
        // Takes User ID as a SharePoint User ID: 12
        // returns username "John Smith"
        {
            string username = "Unknown User";
            if (!(UserID == 0))
            {
                SPWeb thisweb = new SPSite(ahp.siteUrl + ahp.webUrl).AllWebs[0];
                foreach (SPUser user in thisweb.SiteUsers)
                {
                    if (user.ID.Equals(UserID))
                    {
                        username = user.Name;
                        break;
                    }
                }
                thisweb.Dispose();
            }
            return username;
        }

string ReportUpdater = GetUserName_ID(GetPPorLookupInteger(item.Properties["ReportUpdater"].ToString()), ahp);

Monday, 24 June 2013

How to see Approver Comments in Alert Notification emails

Step 1: Select “Publish a Major version” of the document:

Step 2: Optionally enter Version comments which will be visible in the Version History but not in the Alert Email:


Step 3: When you set the Approval Status to “Approved”, enter the approver comments that will be visible in the alert email that is sent out:

Step 4: When the Alert is received by the user, they will see the Approver comments in the body of the email: